

There are many tutorials about creating buttons and graphics in the new 'Web 2.0' style. Unfortunately, all these tutorials are for Photoshop users. The Gimp users are completely ignored. So, I have decided to correct this error - this is a tutorial on how to create a Web 2.0 style button in Linux using Gimp(will work in windows as well).
In this tutorial we will see how to create a Web 2.0 button - you know the kind I am talking about. Rounded corners, gradients, 3D effect - the works. I am using Gimp 2.2.8 in this tutorial. Before starting, get the latest stable version of Gimp(right now it is 2.2.13). Somewhat earlier versions will work as well - if it supports the rounded selection option(more about that later).
Create the Image
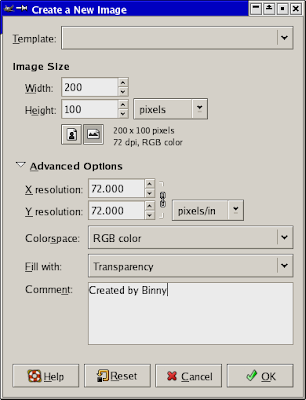
If you are ready, lets get to business. First create a new image with the following specifications...
- Width - 200px
- Height - 100px
- Background - Transparent
The Button
Now create a rectangle selection( button) with the height and width of the button we are going to create.
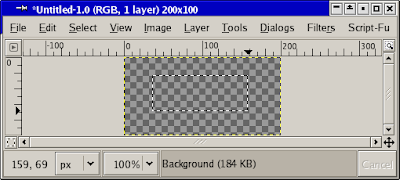
Click on 'Select->Rounded Rectangle' on the menu bar. If this option is not there, you are using an old version of Gimp. Try 'Script-Fu->Selection->Round'. If that is also not there, you are using a really old version of Gimp. Either upgrade you gimp to a newer version or learn how to make a rounded selection in the old way. Click OK in the 'Rounded Rectangle' Dialog to make our rectangle selection, well, rounded.
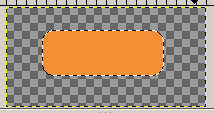
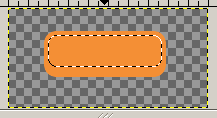
Now fill it with a web 2.0 colour - anything bright and/or blinding will do fine. We will use the color of the RSS icon(#f48f35) - you cannot get any more Web 2.0'er than that. Now you should have something like this...
The Highlight
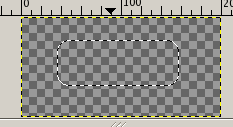
The next step is to create a small rounded rectangle selection inside this rectangle at the top. Use the same methods as described above. The result will look like this...
Create a new layer and select the Gradient Tool( or L on the keyboard). Create a gradient in the new layer like this.
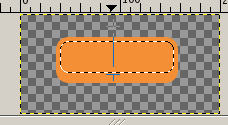
Now you have...
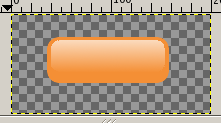
Text
Now add the text using the text tool( ). I use a white color with 'Ellinia CLM Bold' as the font. You can choose what ever you want.
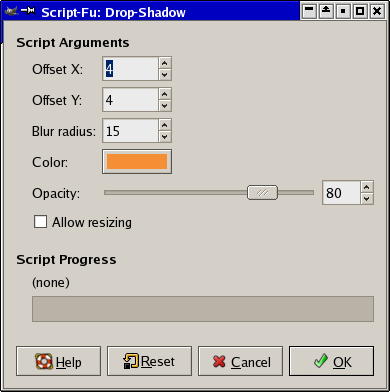
That's it - you got a button that is as Web 2.0 as del.icio.us. You may have to tweak the transparency of the layers to make it look perfect. You can make it a bit better by using a small shadow of the outer rounded rectangle with the color #f48f35. You can do this by selecting the layer with the outer rectangle and selecting 'Scrit-Fu->Shadow->Drop Shadow'
To see the full effect giving the image a white background - create a new layer, move it to the bottom of the layer stack and fill it with white color.
That's it!
Now you have the final image. Is this Web 2.0 or what?

Photoshop Tutorials
There many photoshop tutorials to do this. Go read them, get the idea of how to do it, and use gimp to do it.
Now, let me see how to create those 'badges'(or violators) in Linux.

50 Comments:
Very good article. This is what I was looking for. Also there are many other different interesting articles I found on this Blog pages. And I want to ask you about possibility of translation some of them on russian on pages of my blog. If it is possible please, let me know.
Thanks
Great article! I was looking for something like this for ages! Thanks alot! Cheers! :)
Gimp stuff posted by you was quite useful Thanks !!
Good article!
Thanks!
Dugg!!!
Web 2.0 has NOTHING to do with buttons like that.
Your mom has nothing to do with buttons like that.
I undid you mom's buttons last night.
web 2.0 is a style of stuff,and its code so it is a part of it. Good job. Rite a tut on diff buttons now.
Thank you for that article! Good to see the gimp getting respect!
just what i want to do, but once i have my first rounded rectangle, gimp will not allow me to do a second rec select on top of it. when i choose rec select and move my curser over the first rectagle, the curser chagners to a 'move' curser. what am i doing wrong?
@Everyone
Thanks for the kind words guys!
@Anonymous
I never faced the selection problem you described. Try de-selecting the selection using the 'Ctrl+Shift+A' keys.
Your rounded corners looks sucks. Use Photoshop :)
look at this:
http://shankarsgimp.blogspot.com/2007/02/subscribe-icon-for-your-feed.html
If you apply the Blur filter to the 'Light' and 'Button' layers, it removes the jagged edges and really cleans up the image.
If you like to make button, you can have a look at button maker, which provides many kinds of tools about making button.
Great article, saved my day, thanks a lot for the clear explanation!
Thanks for posting some help for Gimp users! My one suggestion is that you do something about the nasty jagged edges, such as what Patrick suggested. Possibly some anti-aliasing could help?
Thanks, very useful.
Awesome, thanks very much! Oh and never mind those narrow minded fools who are so rude for posting those lame comments.
AnRkey
Making colourful buttons has nothing to do with web 2.0. Sorry. Of course it is nice design according to some voices...
great
Hey, thanks for posting this. It's easy, and makes nice looking buttons. You can see the ones I made last weekend on the site linked in my profile if you want to check them out. :)
Wow, great helped me, thanks very much!
Thank you very much. This is going to help me enormously!
Simple (when you know how of course), I've been trying to figure out how to do that for ages.
Well written and easy to follow, thanks for taking the time to write the tutorial.
Excellent articl
Thanks alot
A good tutorial for our linux friends.
I have a blog with similer content about
web 2.0 graphics
Thank you so much!
Thank you! =)
Thank you. GIMP is a powerful tool, but many of the features are hidden from the users.
Thanks! this is just what i needed!
thanks! i'm a newcomer to GIMP and that was a helpful tutorial.
Thank you for publishing this... I am looking forward to updating my blog with these buttons!
Very helpful tutorial and how I can create buttons in Gimp. But I do have a question. Now that I have the xcf doc, I can not get it to rinder in my browser. I dunno if it is just a windows thing or if I should try it in firefox, but I need my buttons to rinder. :D Do you have any idear what I am doing wrong?
@angie,
Download the XCF file and open it in GIMP.
Great tutorial. I found that when I was putting the shine on the button I needed to start the selection from outside the orange rounded corner.
Also the text you use on your final buttons are really horrible - it really lets down what is really a great design.
I will give you a link when I am finished.
Thanks for the tutorial!
Hi,
The image I created from scratch from the instructions in this article is here: https://magneticbooks.com.au/icons/checkout-button.png
-Andrew
Great article. Thanks for giving me another reason to stick with GIMP. Long live open source.
Several problems- exactly how do you create a 2nd rectangle inside of the first? I'm new to GIMP so leaving out an important step prevents me from understanding what you're trying to make.
Thank you so much. I'm absolutely new to this. Started today and already figured out a lot. downloaded the xcf button and opened the layers to see there's a lot more to it than what's in the tutorial like making the shadow layers to give it 3d floating look. Awesome! Thanks again!
Thank you so much for the guide... It is very helpful. This is the first time i have created such a wonderful button after following the guide...
Thanks! I found that selecting an inner square rectangle and then selecting rounded rectangle from the menu did the trick.
Nice post. Many thanks for sharing this informative resource.GIMP can accomplish the essential image workflow steps like resizing, editing, cropping images, combining multiple images and converting between different image formats.
Great resource! At first I thought "Wow, I could just change the color and text" for my project, but then realized that wouldn't teach me anything. GIMP n00b here, but I followed your steps and I'm very happy with the result (had to fool with different colors with the gradient of course)!
The new buttons will not be "live" for a day or two, but at least the graphics are mainly done thanks to you excellent tutorial.
Wow, this was my 1st GIMP creation! Thanks for the tut Bin :o)
Excellent tutorial. So easy to follow. Thank you! :)
This is a great tutorial - but it is missing an essential part for making good web2.0 buttons - is there an easy way to make a hover/active copy? Something that is identical only brighter colors?
I just wanted to say thank you very much for this. I am trying to build a nice web site with every aspect of it created from scratch by me. I am hard coding it myself and creating all of my own graphics. I would like to share with everybody that if you use the blur tool and blur the edges on the top layer to blend them in a bit, it really does make it look much nicer. Excellent tutorial. Thanks again.
Thanks for the tutorial, this really helped me to get started with making web buttons with GIMP!
Post a Comment